
You just finished fixing Mrs. Johnson’s kitchen faucet, replaced two outlets, and touched up some paint. Great work. Now comes the part most handymen dread: figuring out how to bill for everything properly.
Here’s what usually happens: You scribble some notes on a scrap of paper, try to remember if you charged for travel time, and then spend way too long creating an invoice that looks… well, let’s just say it doesn’t match the quality of your work.
There’s a better way. This guide shows you exactly how to create professional handyman invoices that get you paid faster and make your business look as skilled as your craftsmanship.
Why Most Handyman Invoices Fail
Look, I’ve seen hundreds of handyman invoices over the years. The good ones get paid within a week. The bad ones? Clients nitpick every line item, ask for “clarification” on obvious charges, and somehow the payment always gets “lost in the mail.”
The difference isn’t the work quality. It’s how professional your invoice looks and how clearly you explain what you did.
Common problems I see:
- Vague descriptions like “fixed stuff” or “maintenance work”
- No breakdown between labor and materials
- Missing travel time or trip charges
- Handwritten invoices that look unprofessional
- No clear payment terms or due dates
Your work deserves better than a napkin invoice. You’re a skilled professional, and your billing should reflect that.
Essential Elements of a Professional Handyman Invoice
Every handyman invoice needs these core elements to look professional and get paid quickly:
Header Information
Your business details:
- Business name (even if it’s just “John Smith Handyman Services”)
- Your phone number and email
- Business address (or service area if you work from home)
- Professional logo or business stamp if you have one
Client information:
- Client name and property address
- Phone number and email
- Invoice number (use a simple system like “HS-001, HS-002…”)
- Service date and invoice date
Detailed Service Breakdown
This is where most handymen mess up. You can’t just write “home repairs - $200.” Break everything down:
For each task, include:
- Specific description: “Replaced leaky kitchen faucet with new Moen single-handle unit”
- Time spent: “Labor: 1.5 hours @ $75/hour”
- Materials used: “Faucet: $89, Supply lines: $12, Plumber’s putty: $8”
- Subtotal for each job
Travel and additional charges:
- Trip charge or travel time if applicable
- Minimum service fees
- Emergency or after-hours rates
- Disposal fees for old materials
Payment Information
- Total amount due (make this number big and bold)
- Payment terms: “Net 15” or “Due upon completion”
- Accepted payment methods: Cash, check, Venmo, Zelle, etc.
- Late payment terms if applicable
Professional Handyman Invoice Template
Here’s a professional template that covers the most common handyman scenarios. This example shows exactly how a real handyman invoice should look:
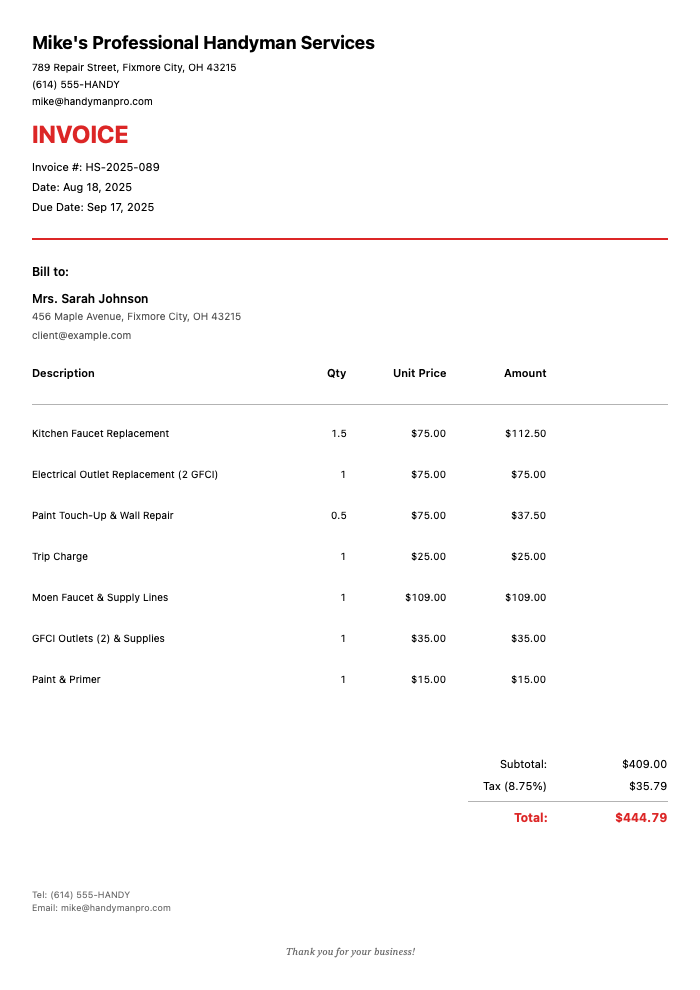
Click to view full size
This invoice template demonstrates all the essential elements we discussed:
- Clear business information with professional contact details
- Detailed service breakdown showing specific tasks completed
- Separate labor and materials with transparent hourly rates
- Professional formatting that matches the quality of your work
- Clear payment terms and accepted payment methods
Billing Best Practices for Multi-Trade Work
Handymen handle everything from plumbing to electrical to carpentry. If you specialize in one of these trades, check out our dedicated guides for plumber invoicing and electrician invoicing. For general multi-trade work, here’s how to bill professionally:
Time-Based vs Project-Based Pricing
Use hourly billing for:
- Small repairs and touch-ups
- Diagnostic work
- Maintenance calls
- Jobs where scope isn’t clear upfront
Use project pricing for:
- Defined tasks like “install ceiling fan”
- Jobs you’ve done many times before
- When client prefers fixed pricing
- Larger projects over $500
Material Markup Strategy
Don’t eat the cost of driving to Home Depot three times. Here are fair approaches:
Option 1: Transparent markup
- List actual material cost
- Add separate line: “Materials markup (15%): $23.50”
- Explains your time and transportation
Option 2: Bundled pricing
- Include reasonable markup in material cost
- Saves line-item confusion
- Faster for simple jobs
Option 3: Trip charge method
- Charge materials at cost
- Add trip charge to cover shopping time
- Works well for clients who buy their own materials
Emergency and After-Hours Rates
Be upfront about premium rates:
- Emergency rate: 1.5x normal hourly rate
- Weekend rate: 1.25x normal rate
- After 6 PM rate: 1.25x normal rate
- Always mention this before starting work
This is where modern invoice apps make a huge difference. Instead of spending 20 minutes writing everything out by hand, apps like InvoiceZap let you create professional invoices in about 30 seconds. You can save templates for common jobs, automatically calculate totals, and email professional PDFs right from your phone.
Common Handyman Billing Scenarios
Multi-Room Projects
When you’re doing work in several rooms, organize by location:
BEDROOM REPAIRS:
- Patched drywall hole          $45
- Painted patch to match        $25

KITCHEN WORK:
- Fixed loose cabinet door      $30
- Replaced burned-out disposal  $125

BATHROOM:
- Caulked around tub           $40
- Fixed running toilet         $65
Warranty and Follow-Up Work
Always include warranty terms:
- “30-day warranty on all labor”
- “Manufacturer warranty applies to all materials”
- “Free return visit if issue recurs within warranty period”
Repeat Customer Pricing
Consider loyalty pricing for regular clients:
- Waived trip charges for monthly customers
- Package deals for routine maintenance
- Referral discounts
Payment Terms That Actually Work
Generic “Net 30” terms don’t work for handyman services. Use terms that match your cash flow needs:
For same-day service:
- “Payment due upon completion”
- “Cash or check accepted at time of service”
For larger projects:
- “50% due at project start, 50% upon completion”
- “Payment due within 7 days of invoice date”
Late payment protection:
- “1.5% monthly service charge on overdue balances”
- “Work completion certificates issued upon full payment”
The key is communicating payment expectations before you start work, not after you hand over the invoice.
Creating Professional Invoices on Your Phone
You don’t need expensive software or a computer to create professional invoices. Modern apps designed for tradespeople can generate polished invoices right from your truck.
When choosing invoice software, look for:
- Speed: Create invoices in under a minute
- Professional templates that match your trade
- Mobile-first design for on-site invoicing
- Automatic calculations for labor, materials, and taxes
- Email delivery for instant sending
This approach transforms invoicing from a dreaded paperwork task into a quick professional finishing touch for every job.
Frequently Asked Questions About Handyman Invoicing
How much should a handyman charge per hour?
Hourly rates vary widely depending on location, experience, and job complexity. Metropolitan areas typically command higher rates than smaller towns, and specialized skills like electrical or plumbing work justify premium pricing above general maintenance rates. Research what other handymen in your area charge, and don’t underprice yourself—your diverse skill set is valuable.
Should I charge a trip fee for handyman services?
Yes, trip fees are standard industry practice. A reasonable service call fee covers your travel time, fuel, and the cost of bringing tools and expertise to the job site. For regular customers nearby, you might waive the trip fee as a loyalty perk. For emergency calls or distant locations, charge the full trip fee or build travel time into your hourly rate.
How do I bill for handyman work when I don’t know how long it will take?
Start with an estimate range: “I expect this will take 2-3 hours at $75/hour, so approximately $150-$225 plus materials.” Get client approval before starting. Track your actual time carefully, and if you exceed the estimate by more than 30 minutes, call the client before continuing. On the final invoice, show actual time worked with specific task descriptions to justify the charges. Honest, transparent communication prevents payment disputes.
What’s the best way to itemize multiple small repairs on one invoice?
Group repairs by room or area for clarity. For example: “Bedroom: Patched drywall ($45), Replaced outlet cover ($15), Fixed closet door ($30)” makes more sense than mixing everything together. If you did 10+ small tasks, consider categories like “Electrical Repairs,” “Plumbing Fixes,” “Carpentry Work,” etc. Each category shows the subtotal, making the final invoice easier to review and harder to dispute.
Should I include a warranty on handyman invoices?
Absolutely. A simple warranty builds trust and shows confidence in your work. Standard terms: “30-day labor warranty on all work performed. If the same issue occurs within 30 days, I’ll fix it free of charge.” For materials, note “Manufacturer warranty applies.” This protects you (client can’t claim issues months later) and reassures clients (you stand behind your work). Include warranty terms clearly on every invoice.
How do I bill for materials when the client provides some but not all?
Create separate line items: “Materials - Customer Provided: $0 (Faucet)” and “Materials - Contractor Provided: $127.50 (Supply lines, washers, plumber’s putty, caulk).” This shows transparency, explains what you purchased versus what they provided, and justifies your material charges. Always include material receipts if the client requests them. For customer-provided materials, note “No warranty on customer-supplied items” to protect yourself.
What payment methods should handymen accept?
Offer multiple convenient options: cash, checks, Venmo, Zelle, CashApp, and PayPal. The more options you provide, the faster you get paid. List all accepted methods clearly on your invoice with specific account details (e.g., “Venmo: @JohnSmithHandyman”). Credit card processing works but comes with transaction fees that cut into margins. Cash and instant transfer apps (Venmo, Zelle) are ideal for handyman businesses.
How do I handle invoice disputes with difficult clients?
First, respond professionally within 24 hours. Review your documentation (photos, time logs, material receipts) and listen to their specific concern. Common disputes: “I thought that was included” (scope creep), “It took longer than expected” (estimation issue), or “Materials cost too much” (pricing transparency). Solution: Provide detailed documentation, offer to walk through the invoice line by line, and if appropriate, offer a small goodwill discount to preserve the relationship. Prevention is better—always get approval for scope and pricing before starting work.
Should I send invoices immediately after completing work or wait?
Send invoices within 24 hours while the work is fresh in the client’s mind. For same-day service calls, create and send the invoice before you leave the property using mobile invoicing apps. Immediate invoicing accomplishes three things: (1) Demonstrates professionalism, (2) Reinforces the value you just delivered, and (3) Gets you in the payment queue faster. The longer you wait, the more likely payment gets delayed or forgotten.
How do I invoice for jobs that require multiple visits?
For multi-visit jobs, you have two options: (1) Invoice after each visit with clear notation “Visit 1 of 3: Rough-in electrical work” or (2) Send one comprehensive invoice after project completion with dates listed for each visit. For larger projects over $500, consider progress billing: “Deposit: 40% before starting, Progress payment: 40% after Visit 2, Final: 20% upon completion.” This protects your cash flow and reduces risk on larger jobs.
Bottom Line: Professional Invoicing Grows Your Business
Your invoicing says as much about your business as your work quality. Professional invoices build trust, reduce payment delays, and make clients more likely to call you again. If you handle larger renovation projects, our professional construction invoice template covers contractor-specific billing needs.
The difference between getting paid in 5 days versus 25 days often comes down to how professional your invoice looks and how clearly you communicate what you did.
Show Off Your Work: Before/After Photos
Handyman repairs often create dramatic visual transformations. That broken fence now standing straight, the patched drywall looking seamless, or the wobbly cabinet now perfectly level—photos tell the story.
Before/after photos build trust and drive referrals. They show potential customers you can actually fix their problems. Use them in:
- Client follow-up messages (“Here’s the transformation!”)
- Social media posts
- Your Google Business Profile
- Estimates (show similar completed repairs)
Pro tip: Snap a quick “before” photo when you arrive, then capture the same angle after completion. Use Before After Photo Compare to create slider animations that show the transformation—potential customers can drag to see the difference. Works great for drywall repairs, painting touch-ups, and any visible improvement.
Ready to create professional handyman invoices that get you paid faster? Browse our free handyman invoice templates or download InvoiceZap and start your 3-day trial. Create this handyman template in under 30 seconds, right from your iPhone or iPad.
Related Resources:
- Professional Construction Invoice Template: Complete Contractor’s Guide
- Landscaping Invoice Template: Professional Billing for Outdoor Services
- Complete Cleaning Service Invoice Template & Billing Guide
- Plumber Invoice Template: Emergency & Scheduled Service Billing
- Electrician Invoice Template: Residential & Commercial Work
- Getting Paid Faster: 7 Invoice Timing Strategies That Work
Ready to Streamline Your Invoicing?
Create professional invoices in 30 seconds with InvoiceZap's mobile-first design. No sign-up required.
Try InvoiceZap FreeTags: