
You just finished replacing a compressor in someone’s refrigerator. The homeowner’s standing in the kitchen waiting. You need to hand them an invoice that looks like it came from a real business — not a scribbled receipt on notebook paper.
An appliance repair invoice does more than ask for money. It protects you legally, sets expectations about warranties, and makes you look like the professional you are. Yet most appliance repair technicians either use generic templates that miss industry-specific details or skip formal invoicing altogether.
Here’s everything you need to create appliance repair invoices that get you paid faster and protect your business.
What Belongs on an Appliance Repair Invoice
Every appliance repair invoice needs standard business information plus several industry-specific elements that general templates skip.
Standard Business Details
- Your company name and contact information — phone, email, website
- Business license number — many states require this on invoices
- Client’s name and address — the property where work was performed
- Invoice number — sequential for your records
- Date of service and invoice date (sometimes different)
- Payment terms — due on receipt, net 15, net 30
Appliance-Specific Information
This is where most generic invoice templates fall short:
- Appliance make, model, and serial number — critical for warranty claims and future service calls
- Appliance age/year — relevant for whether repair or replacement was recommended
- Problem reported by customer — what they told you was wrong
- Diagnosis and work performed — what you actually found and fixed
- Parts used with part numbers — specific manufacturer part numbers, not just “gasket”
- Warranty information — coverage period for parts and labor separately
Recording the make, model, and serial number isn’t just good practice — it’s essential. When a customer calls back six months later about the same fridge, you can pull up exactly what you did without a second diagnostic visit.
Common Line Items for Appliance Repair Invoices
Here’s what typical appliance repair invoices include. Adjust rates to your market — these reflect US national averages.
Service Charges
| Line Item | Typical Rate | Notes |
|---|---|---|
| Diagnostic / Service Call Fee | $50–$100 | Charged regardless of repair |
| Hourly Labor | $75–$150/hr | Varies by region and specialization |
| Flat-Rate Repair (minor) | $100–$250 | Simple fixes like thermostat replacement |
| Flat-Rate Repair (major) | $250–$600 | Compressor, motor, control board |
| Emergency / After-Hours | $125–$250/hr | Evenings, weekends, holidays |
| Travel / Trip Charge | $25–$75 | Distance-based, sometimes waived |
Common Parts
| Part Category | Price Range | Markup |
|---|---|---|
| Thermostats and sensors | $20–$80 | 30–50% |
| Heating elements | $30–$150 | 30–50% |
| Control boards | $100–$400 | 25–40% |
| Compressors | $200–$600 | 20–35% |
| Motors (fan, drain, drive) | $50–$250 | 30–50% |
| Door gaskets and seals | $30–$120 | 40–60% |
| Water inlet valves | $30–$80 | 35–50% |
| Pumps (drain, circulation) | $75–$250 | 25–40% |
Additional Charges
| Item | Rate | When to Apply |
|---|---|---|
| Disposal of old parts | $15–$50 | Compressors, motors with refrigerant |
| Refrigerant recharge | $100–$350 | By the pound, EPA certified |
| Appliance haul-away | $50–$150 | Full unit removal |
| Follow-up visit (warranty) | $0 | Covered under repair warranty |
| Second opinion documentation | $50–$75 | Written assessment for insurance |
Pricing Models: Which Works for Your Business
Most appliance repair businesses use one of three approaches, and some combine them.
Flat-Rate Pricing
You charge a fixed price per repair type regardless of time spent. The customer knows the total before you start, which eliminates billing surprises.
Works best for: Common repairs you’ve done hundreds of times. Refrigerator thermostat replacements, dishwasher pump swaps, dryer heating element changes.
Risk: Unusual complications eat into your margin. That “simple” control board swap turns into rewiring when you discover corroded connectors.
How to set rates: Track your average time per repair type over 50+ jobs. Multiply your target hourly rate by average time, add average parts cost plus markup, and add 15–20% buffer for complications.
Hourly Plus Parts
You charge a diagnostic fee, then hourly labor plus parts at markup. Transparent, but customers sometimes get nervous watching the clock.
Works best for: Complex diagnostics, older appliances where you’re not sure what you’ll find, commercial equipment.
Tip: Give the customer a range estimate after diagnosis. “Based on what I’m seeing, this should take 1–2 hours plus the part, so you’re looking at $275–$425 total.” They almost always say yes when you frame it that way.
Diagnostic Fee Applied to Repair
Charge $75–$100 for the diagnostic visit. If the customer approves the repair, that fee gets credited toward the total. If they decline, you keep the diagnostic fee.
This is probably the most common model in residential appliance repair. Customers feel like the diagnostic was “free” if they go ahead with the fix, and you’re compensated for your time and expertise either way.
Warranty and Guarantee Clauses
This section is where most appliance repair invoices are weakest — and it’s where problems come from months later.
What to Warranty
Parts warranty: Most replacement parts come with a manufacturer warranty (typically 1 year). Pass this through to the customer and note it on the invoice. Your obligation is to install it correctly; the manufacturer covers defects.
Labor warranty: This is your warranty. Industry standard is 30–90 days on labor. Some shops offer 6 months or a year to differentiate themselves. Pick a period you can actually honor.
What NOT to warranty: Clearly state exclusions. Customer misuse, power surges, pest damage, and pre-existing conditions unrelated to your repair should all be excluded.
Sample Warranty Language
Here’s warranty text you can adapt for your invoices:
Parts Warranty: Replacement parts are covered by the manufacturer’s warranty for the period specified by the manufacturer (typically 12 months from installation date). Warranty claims on parts will be processed through the manufacturer.
Labor Warranty: Labor is warranted for 90 days from the date of service. If the same issue recurs within the warranty period due to workmanship, we will return and correct the problem at no additional labor charge. This warranty does not cover new or unrelated issues, customer misuse, power surge damage, or pest-related damage.
Warranty is void if: The appliance is serviced by another technician, the appliance is moved to a different location, or modifications are made to the repair.
Put this on every invoice. Not in tiny print at the bottom — in a clearly readable warranty section. It protects you and sets honest expectations.
Sample Appliance Repair Invoice
Here’s what a complete, professional appliance repair invoice looks like:
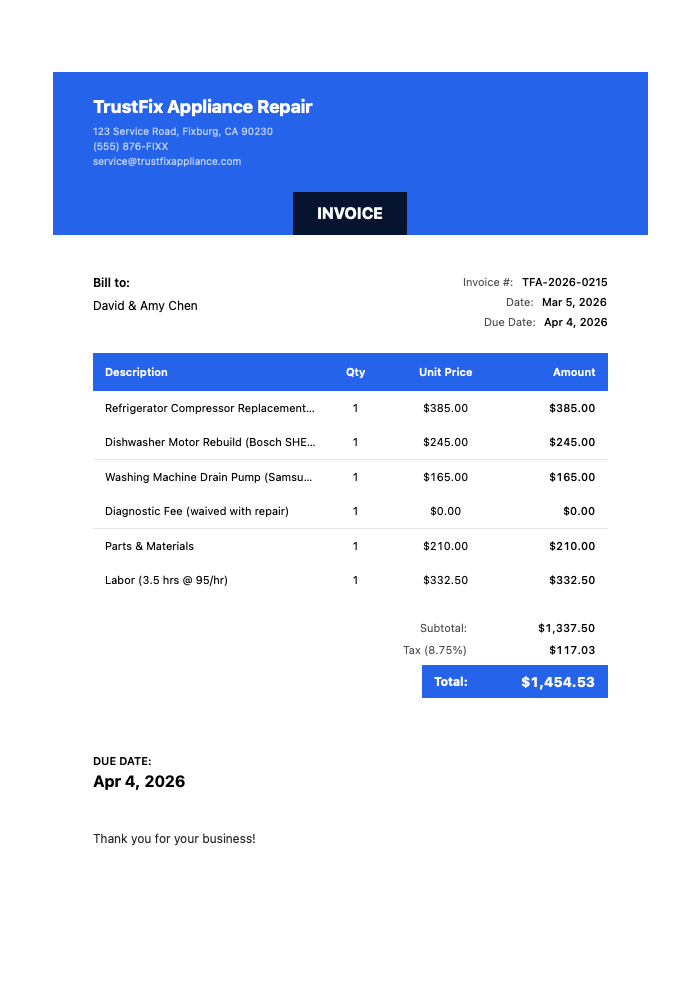
Click to view full size
Notice the details: specific line items for each appliance repair, parts and labor separated, diagnostic fee included, and clear totals with tax. This looks professional and covers you if questions come up later.
Invoicing Tips That Speed Up Payment
Beyond having the right template, a few habits make a real difference in how fast you get paid.
Invoice Immediately After Service
The best time to present an invoice is when the customer is watching their appliance work again. They’re happy, grateful, and the value of your service is obvious. Wait two days to email an invoice and that urgency fades.
Mobile invoicing apps solve this problem. Instead of going home, typing up an invoice, and emailing it later, you create and present it on-site. InvoiceZap handles this in about 30 seconds — select the client, add your line items, and hand your phone to the customer or send it right there.
Always Document What You Found
Take photos of the problem before and during repair. Note the failed part, the condition, and what you replaced it with. This documentation goes into your records (not necessarily on the invoice itself) and protects you if there’s a dispute.
Separate Parts from Labor
Some customers will try to negotiate on a single lump-sum price. When parts and labor are itemized separately, they can see exactly where the money goes. The $145 part costs what it costs. Your $125/hour rate is your rate. There’s less room for “can you do it for less?” when everything’s transparent.
Offer Payment Flexibility
Accept multiple payment methods and list them on the invoice. Check, Venmo, Zelle, bank transfer. The easier you make it to pay, the faster the money arrives. Some technicians offer a small discount (2–3%) for same-day payment, which works surprisingly well.
Building Your Invoice System
You have two realistic options for creating appliance repair invoices consistently.
The Template Approach
Create a template in Word, Google Docs, or Excel with all the sections above pre-formatted. Duplicate it for each job, fill in the specifics, export to PDF, and email or print it.
Time per invoice: 8–15 minutes, depending on complexity.
Downsides: Manual numbering, no client history, easy to forget warranty language, can’t create on-site without a laptop.
The App Approach
Set up your business details, standard line items, and warranty text once in an invoicing app. For each job, select the client, tap your line items, adjust quantities and prices, and send.
Time per invoice: Under a minute.
InvoiceZap works well for appliance repair because you can save your common parts and services as reusable line items — “Diagnostic Fee,” “Evaporator Fan Motor,” “Hourly Labor” — and assemble invoices from those building blocks on your iPhone between jobs. Store the warranty clause in your invoice notes template, and it appears on every invoice automatically.
Download InvoiceZap and try it with a 3-day free trial — set up your appliance repair line items once and create professional invoices on-site in seconds.
Show Off Your Work: Before/After Photos
Appliance repairs aren’t always dramatic visually, but some absolutely are — ice-encrusted evaporator coils, burned-out heating elements, corroded water lines. Documenting these builds trust with customers and makes great marketing material.
Before/after photos work for:
- Social media posts showing your expertise
- Google Business Profile updates
- Customer follow-up (“here’s what was wrong”)
- Insurance documentation requests
Pro tip: Use Before After Photo Compare to create slider comparisons — potential customers can drag to see the transformation. These get way more engagement than plain photos when you’re posting to social media or your website.
The Bottom Line
A professional appliance repair invoice isn’t just paperwork — it’s your business’s face. It tells customers you’re legitimate, organized, and stand behind your work. The warranty clause protects you from unreasonable callbacks. The detailed line items justify your pricing. The appliance information creates a service history that makes future jobs easier.
Whether you build a template or use an app, the key is consistency. Every invoice should look the same, include the same information, and go out the same day you complete the job.
Ready to stop spending 15 minutes per invoice? Try InvoiceZap free for 3 days and create professional appliance repair invoices on your iPhone in 30 seconds.
Ready to Streamline Your Invoicing?
Create professional invoices in 30 seconds with InvoiceZap's mobile-first design. No sign-up required.
Try InvoiceZap FreeTags: